Many websites prepare special trimmed down websites for mobile clients. Only functionally relevant content is displayed in these trimmed down pages. So if bandwidth is precious for you OR if you just want to get your things done quickly, you can use User Agent Switcher firefox add-on where you can set that you are browsing from mobile
Steps
======
After installing the addon, go to Tools -> Default User Agent -> Select any agent name which belongs to mobile.. like IPhone 3.0
Now go ahead and browse any site which has custom pages for mobile. You will observe that only trimmed down content is being displayed.
Test 1
======
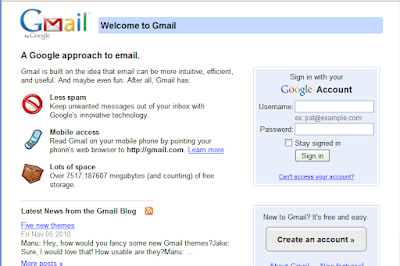
Open gmail.com in firefox browser without activating the above add-on. You will see below page
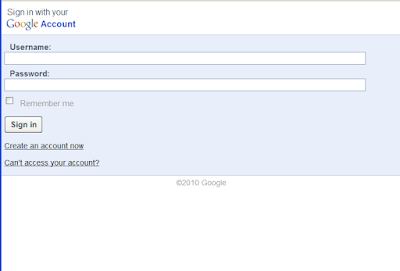
but once you use the above IPhone agent, it will display the below trimmed down page in firefox browser
Test2
=====
If you make a google search in firefox without the addon, it will display the results along with Google Ads. But if you use the above add-on with IPhone as user agent, it will only display search results in firefox (WITHOUT Google ads)
Technicality
============
The server identifies the client based on User-Agent HTTP request header. So this add-on just replaces the header value from firefox to any selected value.
Custom Mobile Headers
=====================
You can also use any custom header. To add a custom header, Tools -> Default User Agent -> Edit User Agents -> New. You can get list of all user agent headers from here.
Please note that the above content is provided only for information purpose.
Monday, November 8, 2010
Friday, June 25, 2010
Invoke ANT targets programmatically using java
You can invoke ant targets programmatically with java using below code. You need to be sure that the jar files inside ANT_HOME\lib are included in project.
import java.io.File;
import org.apache.tools.ant.Project;
import org.apache.tools.ant.ProjectHelper;
public class Test {
public static void runAnt(){
File buildFile = new File("build.xml");
if(!buildFile.exists()){
System.out.println("ERROR :: File "+buildFile.getAbsolutePath()+" does not exist");
}
Project p = new Project();
p.setUserProperty("ant.file", buildFile.getAbsolutePath());
p.init();
ProjectHelper helper = ProjectHelper.getProjectHelper();
p.addReference("ant.projectHelper", helper);
helper.parse(p, buildFile);
p.executeTarget(p.getDefaultTarget());
}
public static void main(String... args){
runAnt();
}
}
Wednesday, June 23, 2010
Build and Deploy SOA Composites using ANT targets
The steps to build and deploy a SOA composite using an ANT target of build.xml is demonstrated in the current post.
Steps
=====
1. Download build.properties and build.xml.
2. Place the above two files inside build or deploy folder of the composite project. i.e. if HelloWorldProject is the directory of the composite project, then these files should be located inside HelloWorldProject/build or HelloWorldProject/deploy
3. Change the property values of build.properties file as per your scenario. The documentation above each property should be self explanatory.
4. Ensure that you have ANT has been installed and paths have been property set in environment. You can find more details of installing ANT here
5. Now open the command promt and change to the directory where the above two downloaded files have been placed.
6. Use the three targets defined in build.xml as explained below ::
- If you require only to build the composite SAR, then type "ant compile-package"
- If you already have the jar and want to deploy onto SOA server, then type "ant deploy"
- If you want to both build and deploy, then type "ant buildAndDeploy" or just typing ant should suffice as buildAndDeploy has been given as the default target in build.xml
Monday, April 26, 2010
Correlation Sets tutorial in SOA 11g using Oracle JDeveloper
Usage of Co-relations sets in SOA 11g has been demonstrated in this blog. Correlation sets are typically used when you need to contact with an already running BPEL instance.
Sample use case of co-relation sets ::
In our current application we need to expose a BPEL service which will take Employee ID as input and asynchronsoulsy calls back another method returning the Name of the given Employee ID.
Now once it receives the Employee ID, it waits on an receive activity to receive the Employee name for the given employee ID. Through a separate service call, we will provide the details of Employee name for the given employee id to the above BPEL instance. Once the BPEL instance receives the name, it proceeds further and callsback the method to return the employee name.
Here the correlation sets are required because when the second service is invoked to provide the details of the employee name, it needs to know to which BPEL instance the details should be provided. This is tracked internally using the correlation sets by setting EmployeeID as the property in the correlation set.
The series of images below demonstrate the development of this sample applicaiton. The completed sample of this tutorial is available here. All the below images are annotated with proper explanation. So the slides are self explanatory.
Slide Show ::
You can access the slide show of images here.
Labels:
correlation sets,
jdeveloper,
oracle,
soa11g
Subscribe to:
Posts (Atom)